


Shared inbox rules in Outlook 365 aren’t exactly the easiest to set up and use.
Shared inbox rules in Outlook 365 aren’t exactly the easiest to set up and use.
After creating a shared inbox, rules can automatically forward emails and reply to messages to make your team’s life easier. But if you don’t build the rules right, you’ll run into issues—and they might even stop working altogether.
In this piece, we’re going to break down:
Why create shared inbox rules?
How to create shared inbox rules in Outlook 365
The most common shared inbox rules to set up
Troubleshooting shared inbox rules that won’t work
Shared inbox rules in Front vs shared inbox rules in Outlook
Let’s dive in.
Why create shared inbox rules?
Adding rules in a shared Outlook 365 inbox allows teams to manage the emails they receive by creating triggers that set off actions to happen automatically.
Teams can create rules to filter emails from specific customers into certain folders or exclude team members from certain emails altogether, so messages reach the right people. Not only does this help your team work more efficiently, but shared inboxes also stop emails from slipping through the cracks so every customer gets a reply.
How to create shared inbox rules in Outlook 365 (and the most common)
To start adding rules to your shared inbox, open your Outlook 365 account settings and, on the "Email tab", select "New".
Then, in the Your Name name field, give your shared inbox a name, like "Customer Support" or "Sales". Continue to fill out the details of the shared inbox you already have set up, including its email address and password.
Next, sign in with your account so you’ll have access to the shared mailbox, and finally, restart Outlook 365 so your changes will be implemented.
Now that your shared inbox is up and running and your team has access to it, you’re ready to start adding rules.
The most common shared inbox rules to set up
Each rule that you create in Outlook 365 needs to have three things:
🙋 A name
⏳ A condition
⚡ An action
You can also add multiple conditions and actions to one rule, and more specific rules can also contain exceptions and conditions to make them more precise.
Here are some common rules you may want to set up to make your shared inbox easier to manage:
1. Reply to emails automatically
Set up your shared inbox to automatically reply to emails by opening the admin center within your settings and going to:
Automatic replies > Edit
Set the toggle to "On"
Select whether the reply will be sent internally or externally
Then, write your reply that’ll be automatically sent out in response to every email and click "Save".
2. Save every sent email (even if it’s not from you)
Keep a level of transparency within your shared inbox by saving every email that’s sent from the account.
Open your settings and find the "Sent Items" setting:
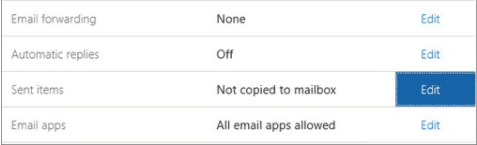
Click "Edit" and toggle the settings, so every email sent from the shared inbox is copied into the mailbox.
3. Automatically forward every email to another account
Make sure emails are forwarded to the right inbox when they land in your shared inbox.
Open your shared inbox settings, click on inbox rules, and click the + symbol to create a new rule for emails received. Then:
On the "When the message arrives" section, click "Apply to all messages"
Under the "Do the following" rule, click more options:
Select Forward, redirect, or send
Then, select Forward the message to or Forward the message as an attachment to
Finally, select the email address you want the messages to get forwarded to
Hit save, and the rule will be put into place. Remember that with this rule, the reply sent from the forwarded address will only go back to the shared inbox—not to the original sender. So, this type of rule is perfect for teams who need to communicate internally before replying from a shared inbox.
4. Limit users from accessing the shared inbox
Don’t want your entire team to have access to a shared inbox?
No problem. You can create a rule to limit who can access a shared inbox. Open up the admin center of the shared inbox and:
Find the "Active Users" section
Click the team member that you don’t want to have access to the inbox
Select "Block"
Save your changes
And just like that—the selected team member will no longer have access to your shared inbox!
Troubleshooting shared inbox rules that won’t work
While Outlook 365 rules aren’t rocket science to set up, it’s not uncommon to run into issues with inbox rules.
There are many reasons why your Outlook 365 rules will stop working, like not enough space in your mailbox or corrupted POP3/IMAP inside your account. But the good news is that—usually—these are usually an easy fix.
Let’s look at the most common reasons why your Outlook 365 rules stop working, and how to fix them.
1. You don’t have enough space
Outlook 365 has a default quota on its rules—just 256KB.
This limit means that the number of rules you can set in a rules folder is limited to between 20 or 30. The way to overcome this is by deleting any rules that you’re not using or combining similar rules together to save space.
2. Your rules aren’t turned on
Sometimes, you create a rule and save it to your shared inbox—it’s just not turned on.
To fix this, click on the "Files" section in your shared inbox settings and then select the "Rules and Alerts" section. Then, find the rule that isn’t working and make sure the checkbox has been selected.
Once the correct box has been checked, your rule should start working.
If all this effort to set up rules in an Outlook 365 inbox seems like a lot of work, there’s a better way. Let’s look at what creating rules for shared inboxes looks like when you use Front instead.
Shared inbox rules in Front vs shared inbox rules in Outlook
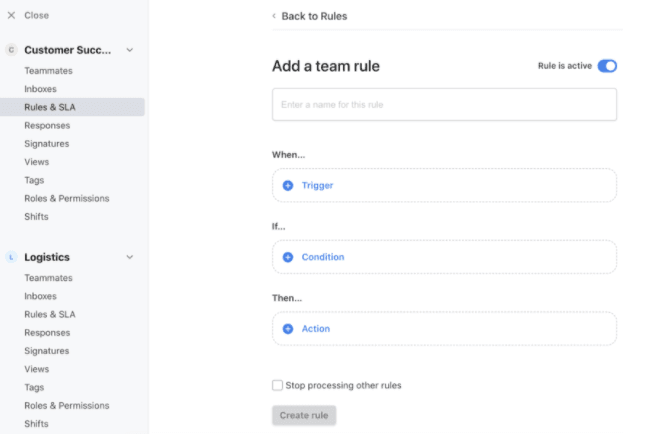
Front’s shared inbox is where teams can collaborate and automate workflows without needing to be a coding expert.
Front’s rules are simple and are split into four types:
Team rules: A rule that’s applied to any shared inbox
Individual rules: A rule that’s applied to an individual’s inbox
Company rules: A rule that can be applied across shared inboxes as well as individual team members’ inboxes
SLA rules for customer service: A type of team rule that’s used to help businesses keep a high standard for response times
Setting these rules up in Front is easy. Once you know what rule you need (based on type), you can use Front’s rules library to create rules using templates.

From there, select a template or click "custom rule", which allows you to build a rule of your own from scratch. You’ll then head to the editing screen, where you can add triggers, conditions, and actions to your rule based on what you want it to do:
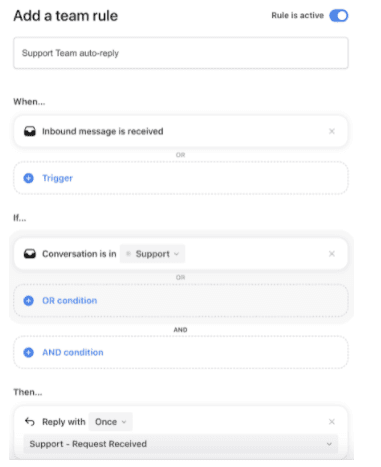
For example, if you want emails sent to a team inbox that handles customer complaints to get an instant reply (e.g., "we will be in touch with you soon"), you can set that up. Just create a condition that once an email lands in that inbox, and Front will automatically reply with a message template of your choice.
Once you’re happy with all of your rules, just click save—and you’re ready to email ✉️
Ready to build a simpler shared inbox for your team? Transform your inbox with Front today!